Appearance
手把手教你用 Rollup 打包并发布自己的工具库📦
随着前端生态的繁荣,工具库几乎是高效开发的必需品,lodash / dayjs / numberal 等实用的工具库相信大家都用过。
我近期在开发 Calendar Graph GitHub 提交日历组件时,发现有很多需要处理颜色的场景,比如:判断一个字符串是否是一个有效的颜色值、hex 颜色值和 rgb 颜色值的互转等,但没有找到一个能很好满足我全部需求的开源库,所以决定自己造一个轮子。
这就是我做 ktools 工具库的原因,本文将介绍如何使用 Rollup 这个轻量的下一代模块打包器打造自己的 TypeScript 工具库。
通过阅读本文,你将学到:
- 如何初始化一个 Rollup 工程项目
- 如何配置 Rollup 和 TypeScript
- 如何编写脚本,构建并发布自己的工具库到 npm 仓库
1 创建并初始化 GitHub 项目
做一个开源库的第一步是创建一个 GitHub(或 Gitlab 等)代码仓库,并进行简单的初始化,主要包括:
- 创建Git提交忽略配置 .gitignore
- 创建开源协议声明 LICENSE
- 初始化 package.json
- 配置 TypeScript tsconfig.json
- 配置 Rollup rollup.config.js
1.1 Git提交忽略配置
为了防止 node_modules 等自动生成的目录/文件提交到远程代码仓库,提交忽略是首先要考虑的事情,前期可以简单配置下即可。
先创建一个 .gitignore 文件
touch .gitignore在新创建的.gitignore文件中增加以下内容:
# dependencies
/node_modules

# compiled output
/dist
详细的配置可以参考 GitHub 官方文档: https://docs.github.com/en/free-pro-team@latest/github/using-git/ignoring-files
1.2 创建开源协议声明 LICENSE
开源协议可以在创建 GitHub 仓库时选择,也可以创建仓库之后再加,一般选择 MIT 协议。
这里介绍一个创建仓库之后补加协议的小技巧。主要分成以下几个步骤:
- 在 GitHub 仓库增加一个文件
- 输入
LICENSE(注意必须全部大写) - 选择协议
- 提交
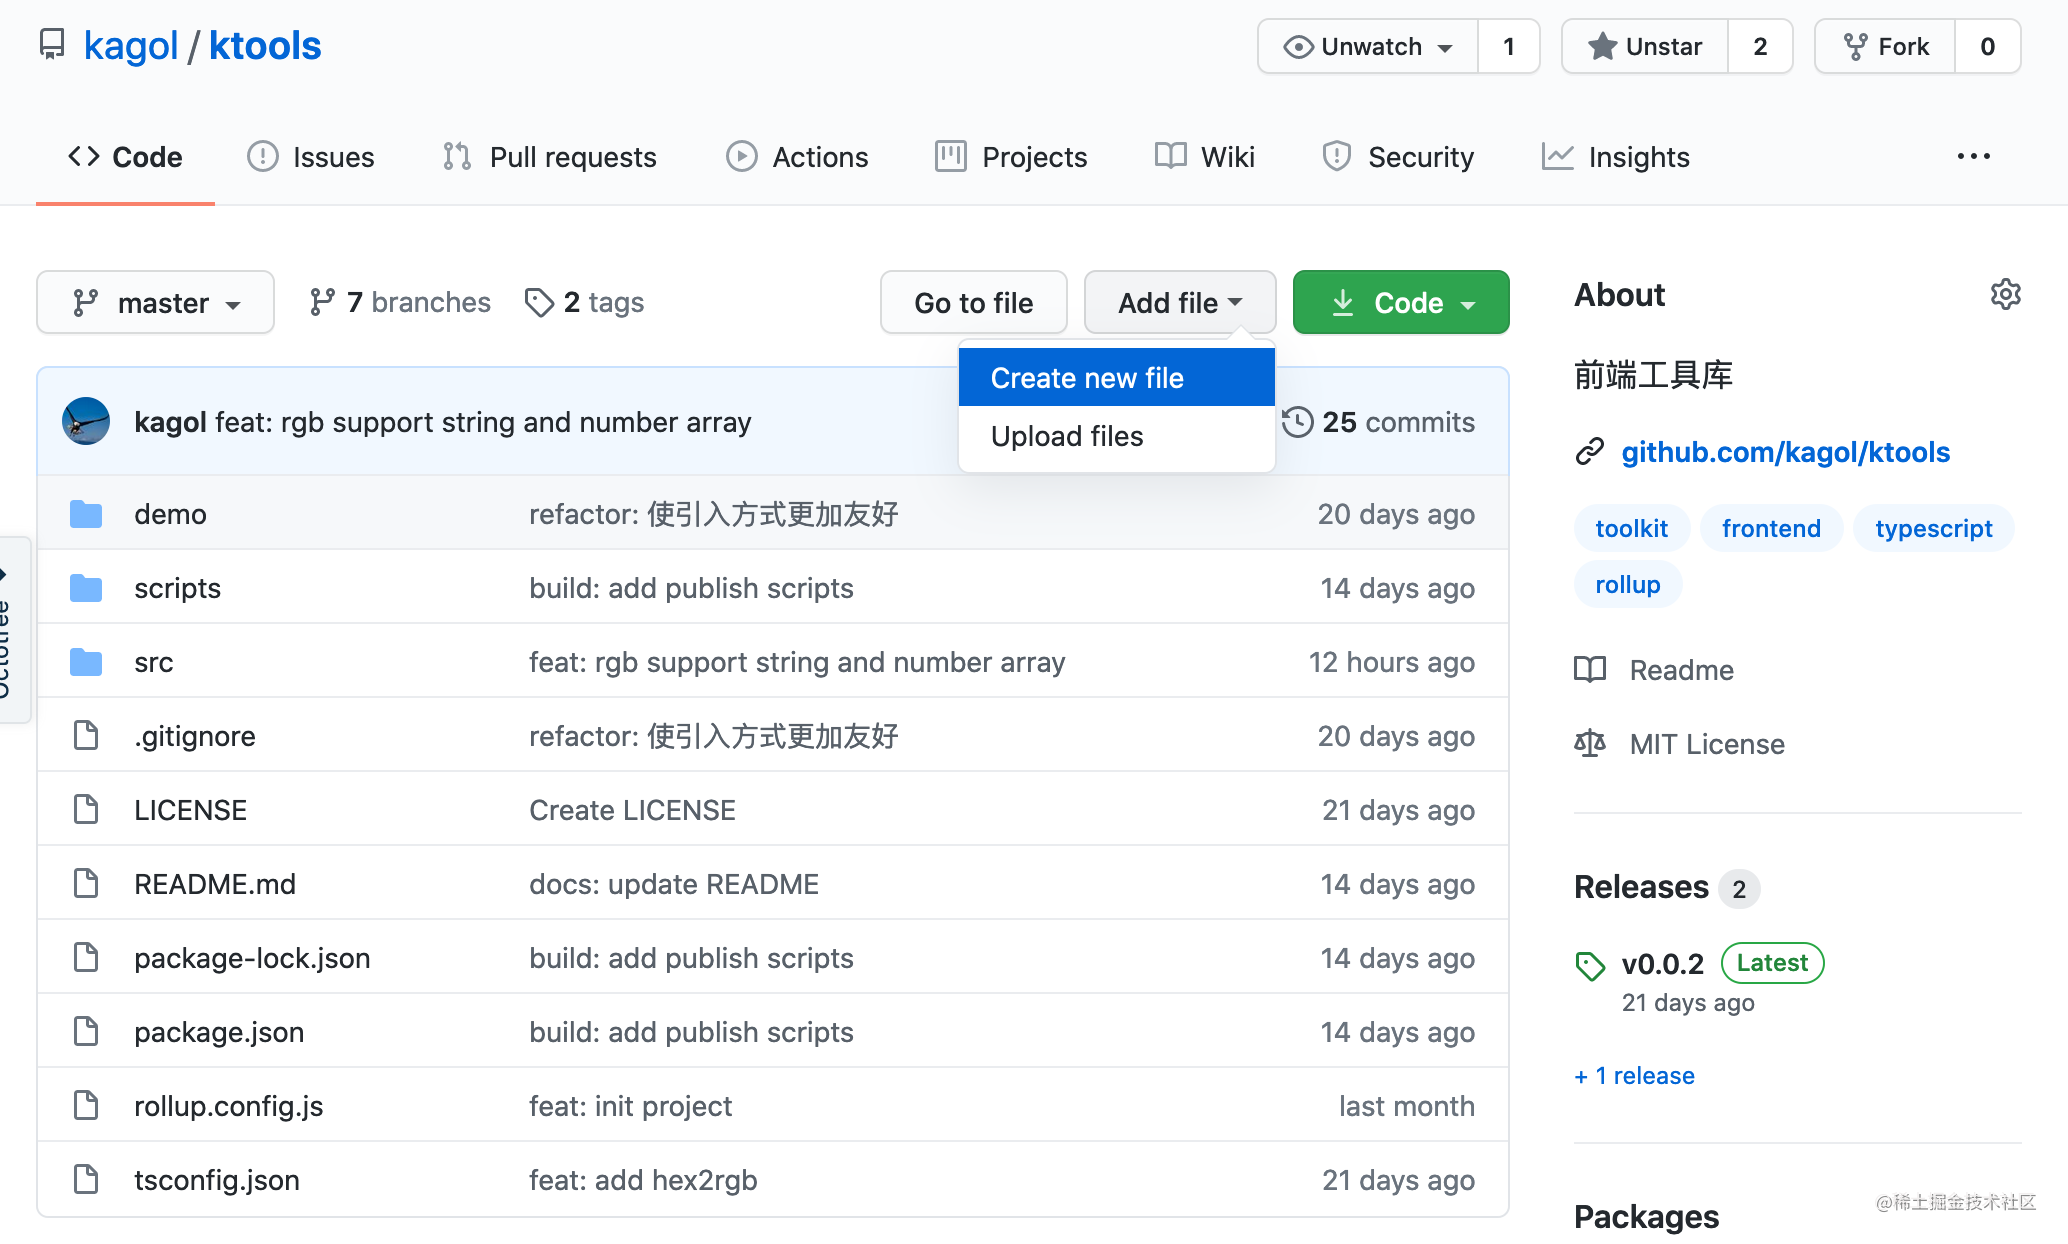
Step 1: 在 GitHub 仓库增加一个文件
在代码仓库的目录结构右上方,有一个 Add file 下拉框,选择其中的 Create new file 选项,进入创建新文件的页面。
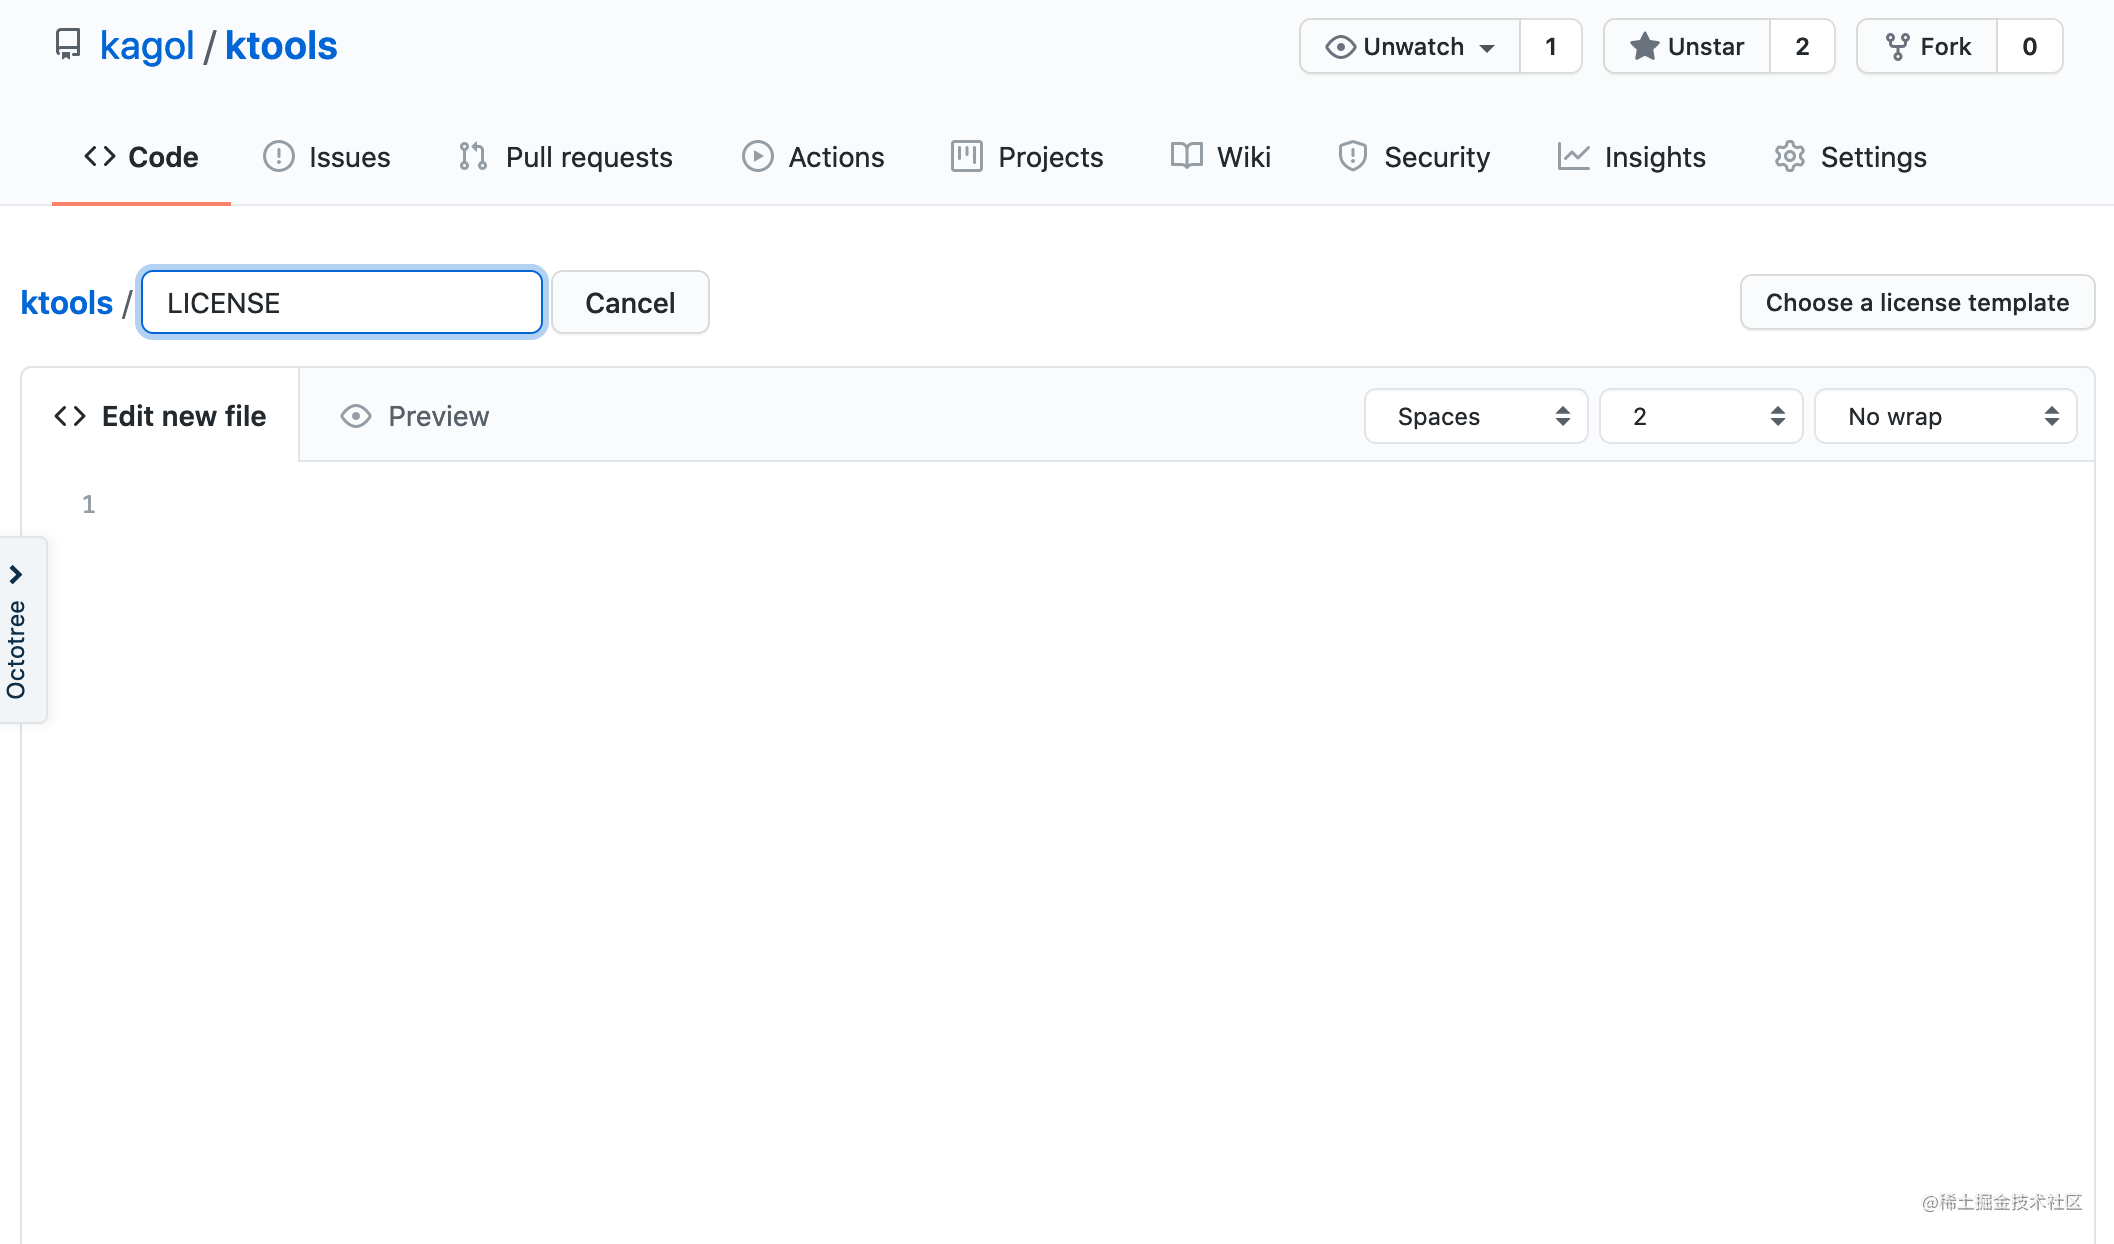
Step 2: 输入 "LICENSE"
在文件名中输入全大些的 LICENSE,这时输入框右边会多出来一个按钮 Choose a license template。
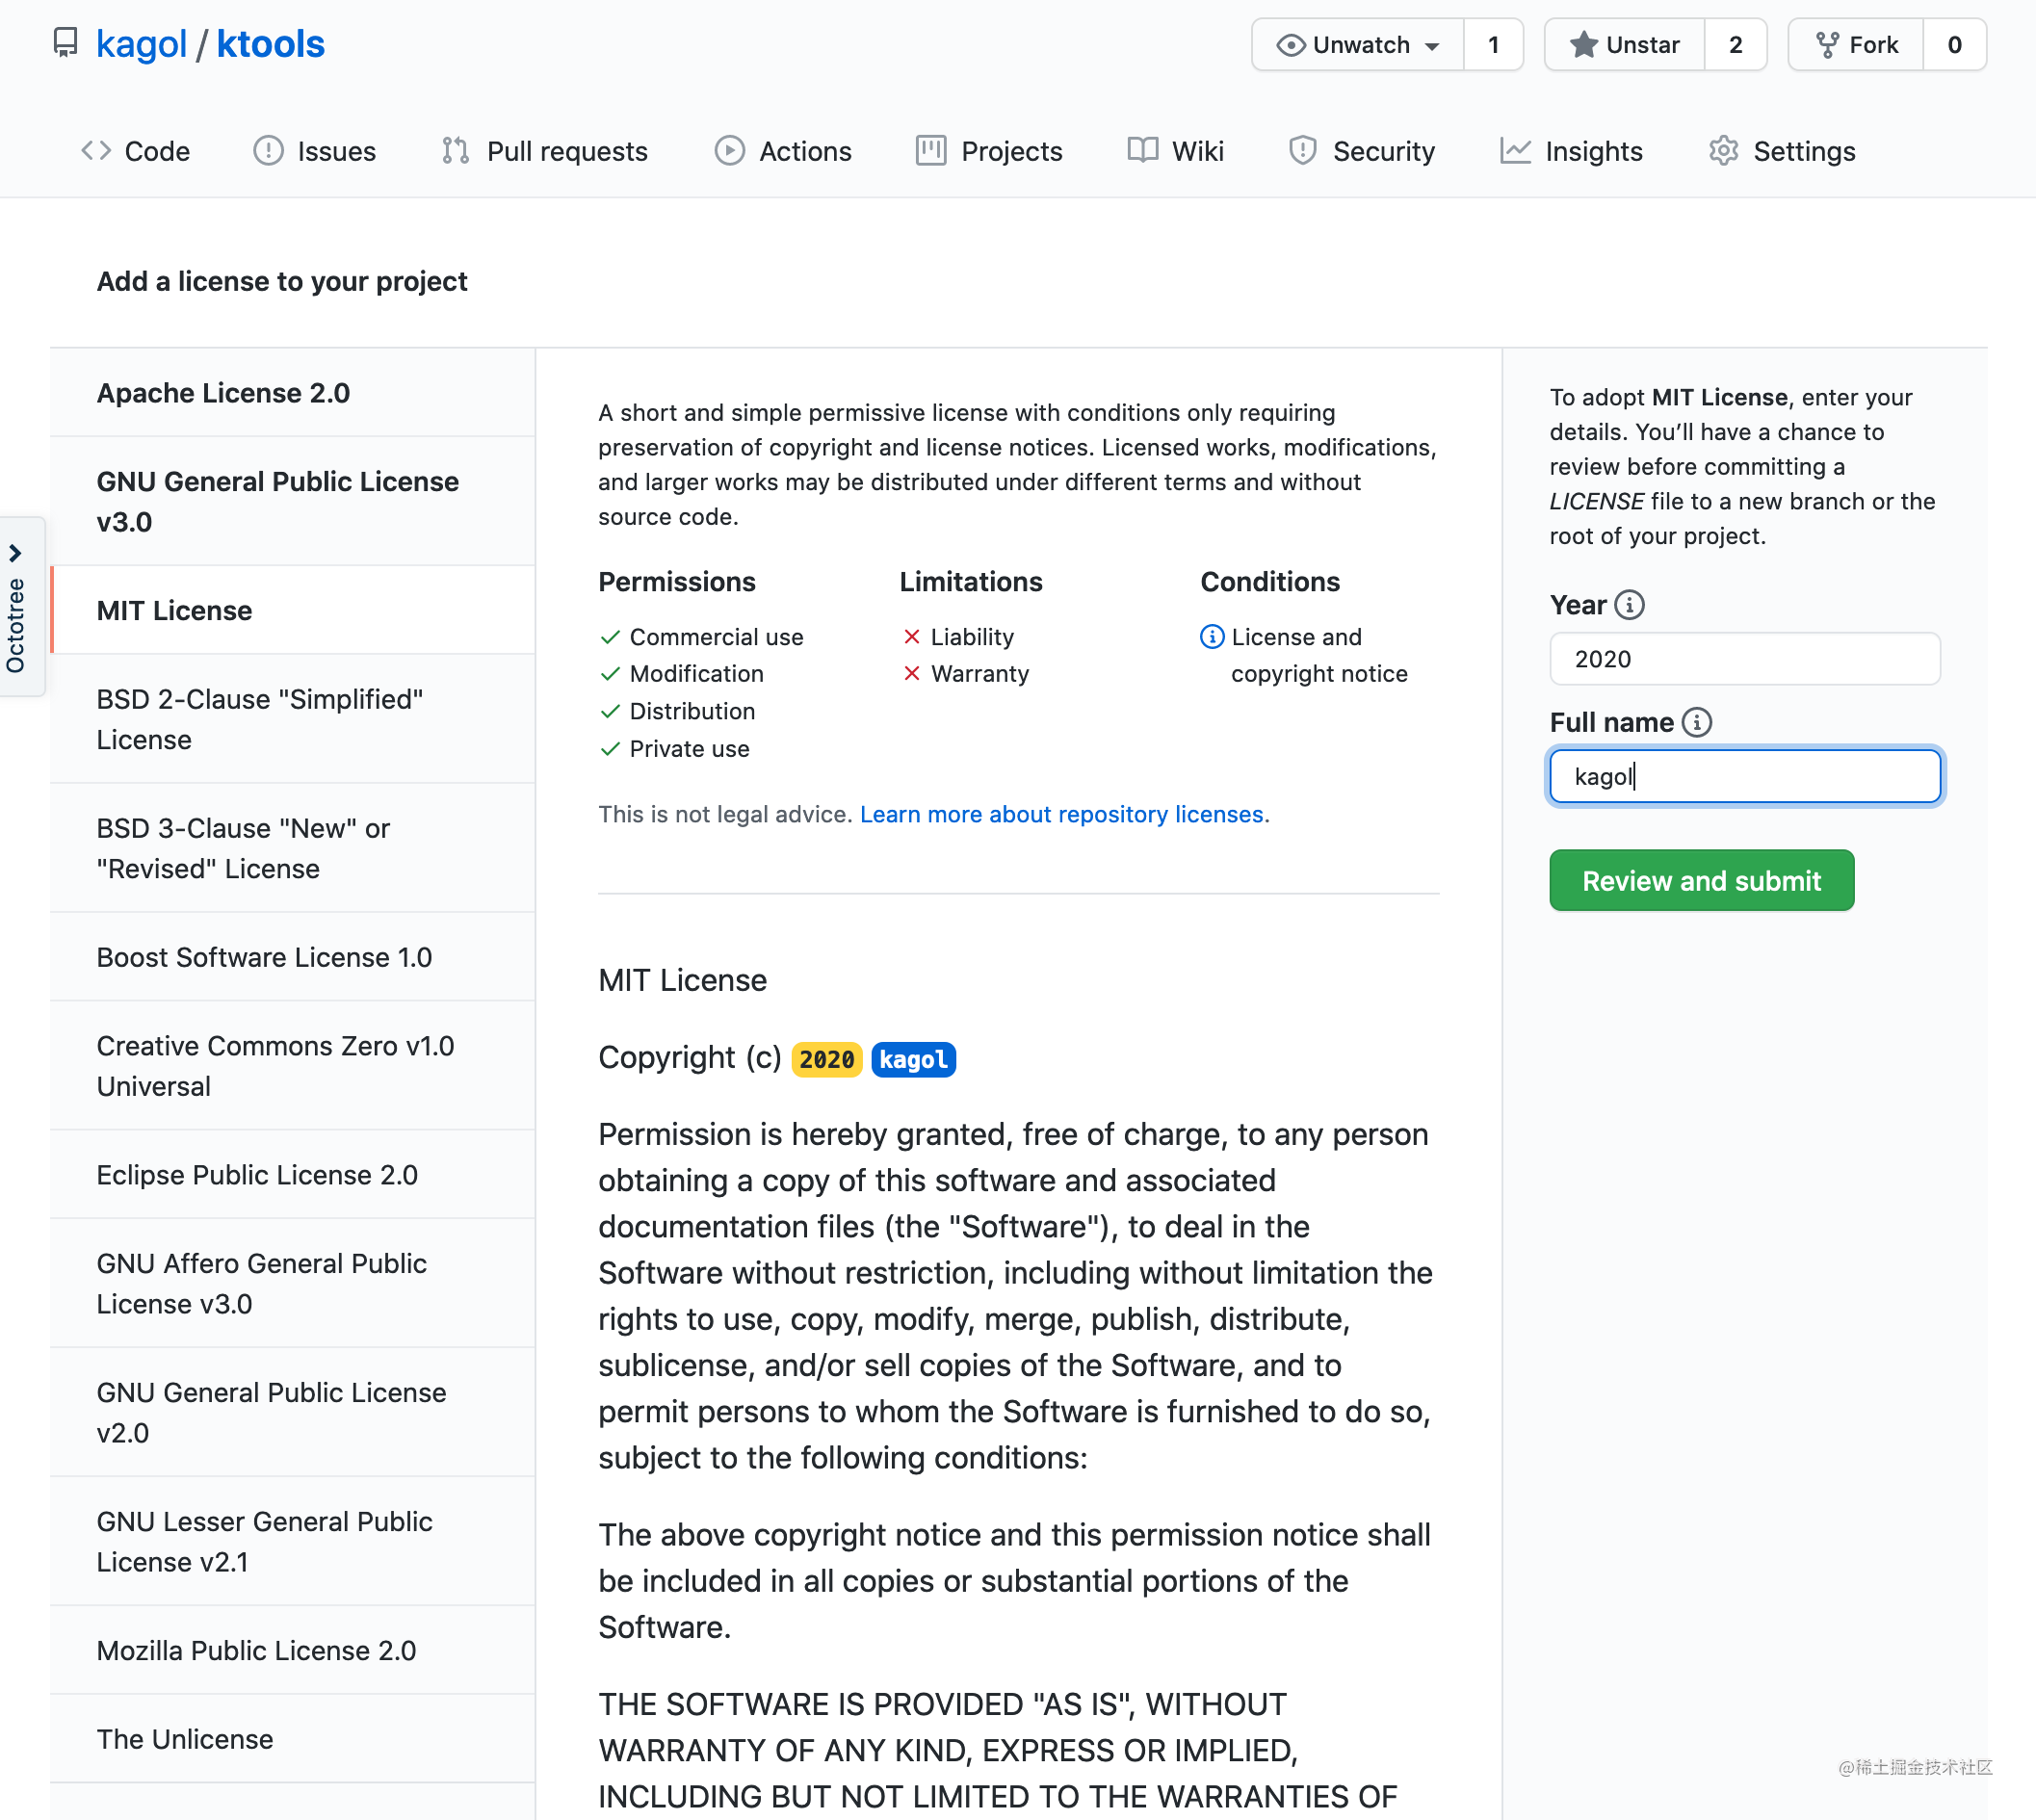
Step 3: 选择协议
点击 Choose a license template 按钮,进入选择协议模板的页面。
我们在左侧目录选择 MIT License,然后在右侧边栏输入年份和作者名字,可以看到中间的 Copyright (c) 后面的年份和作者会相应变化,点击 Review and submit 按钮,即可返回创建文件的页面,并自动用刚刚选择的协议内容填充到 LICENSE 文件中。
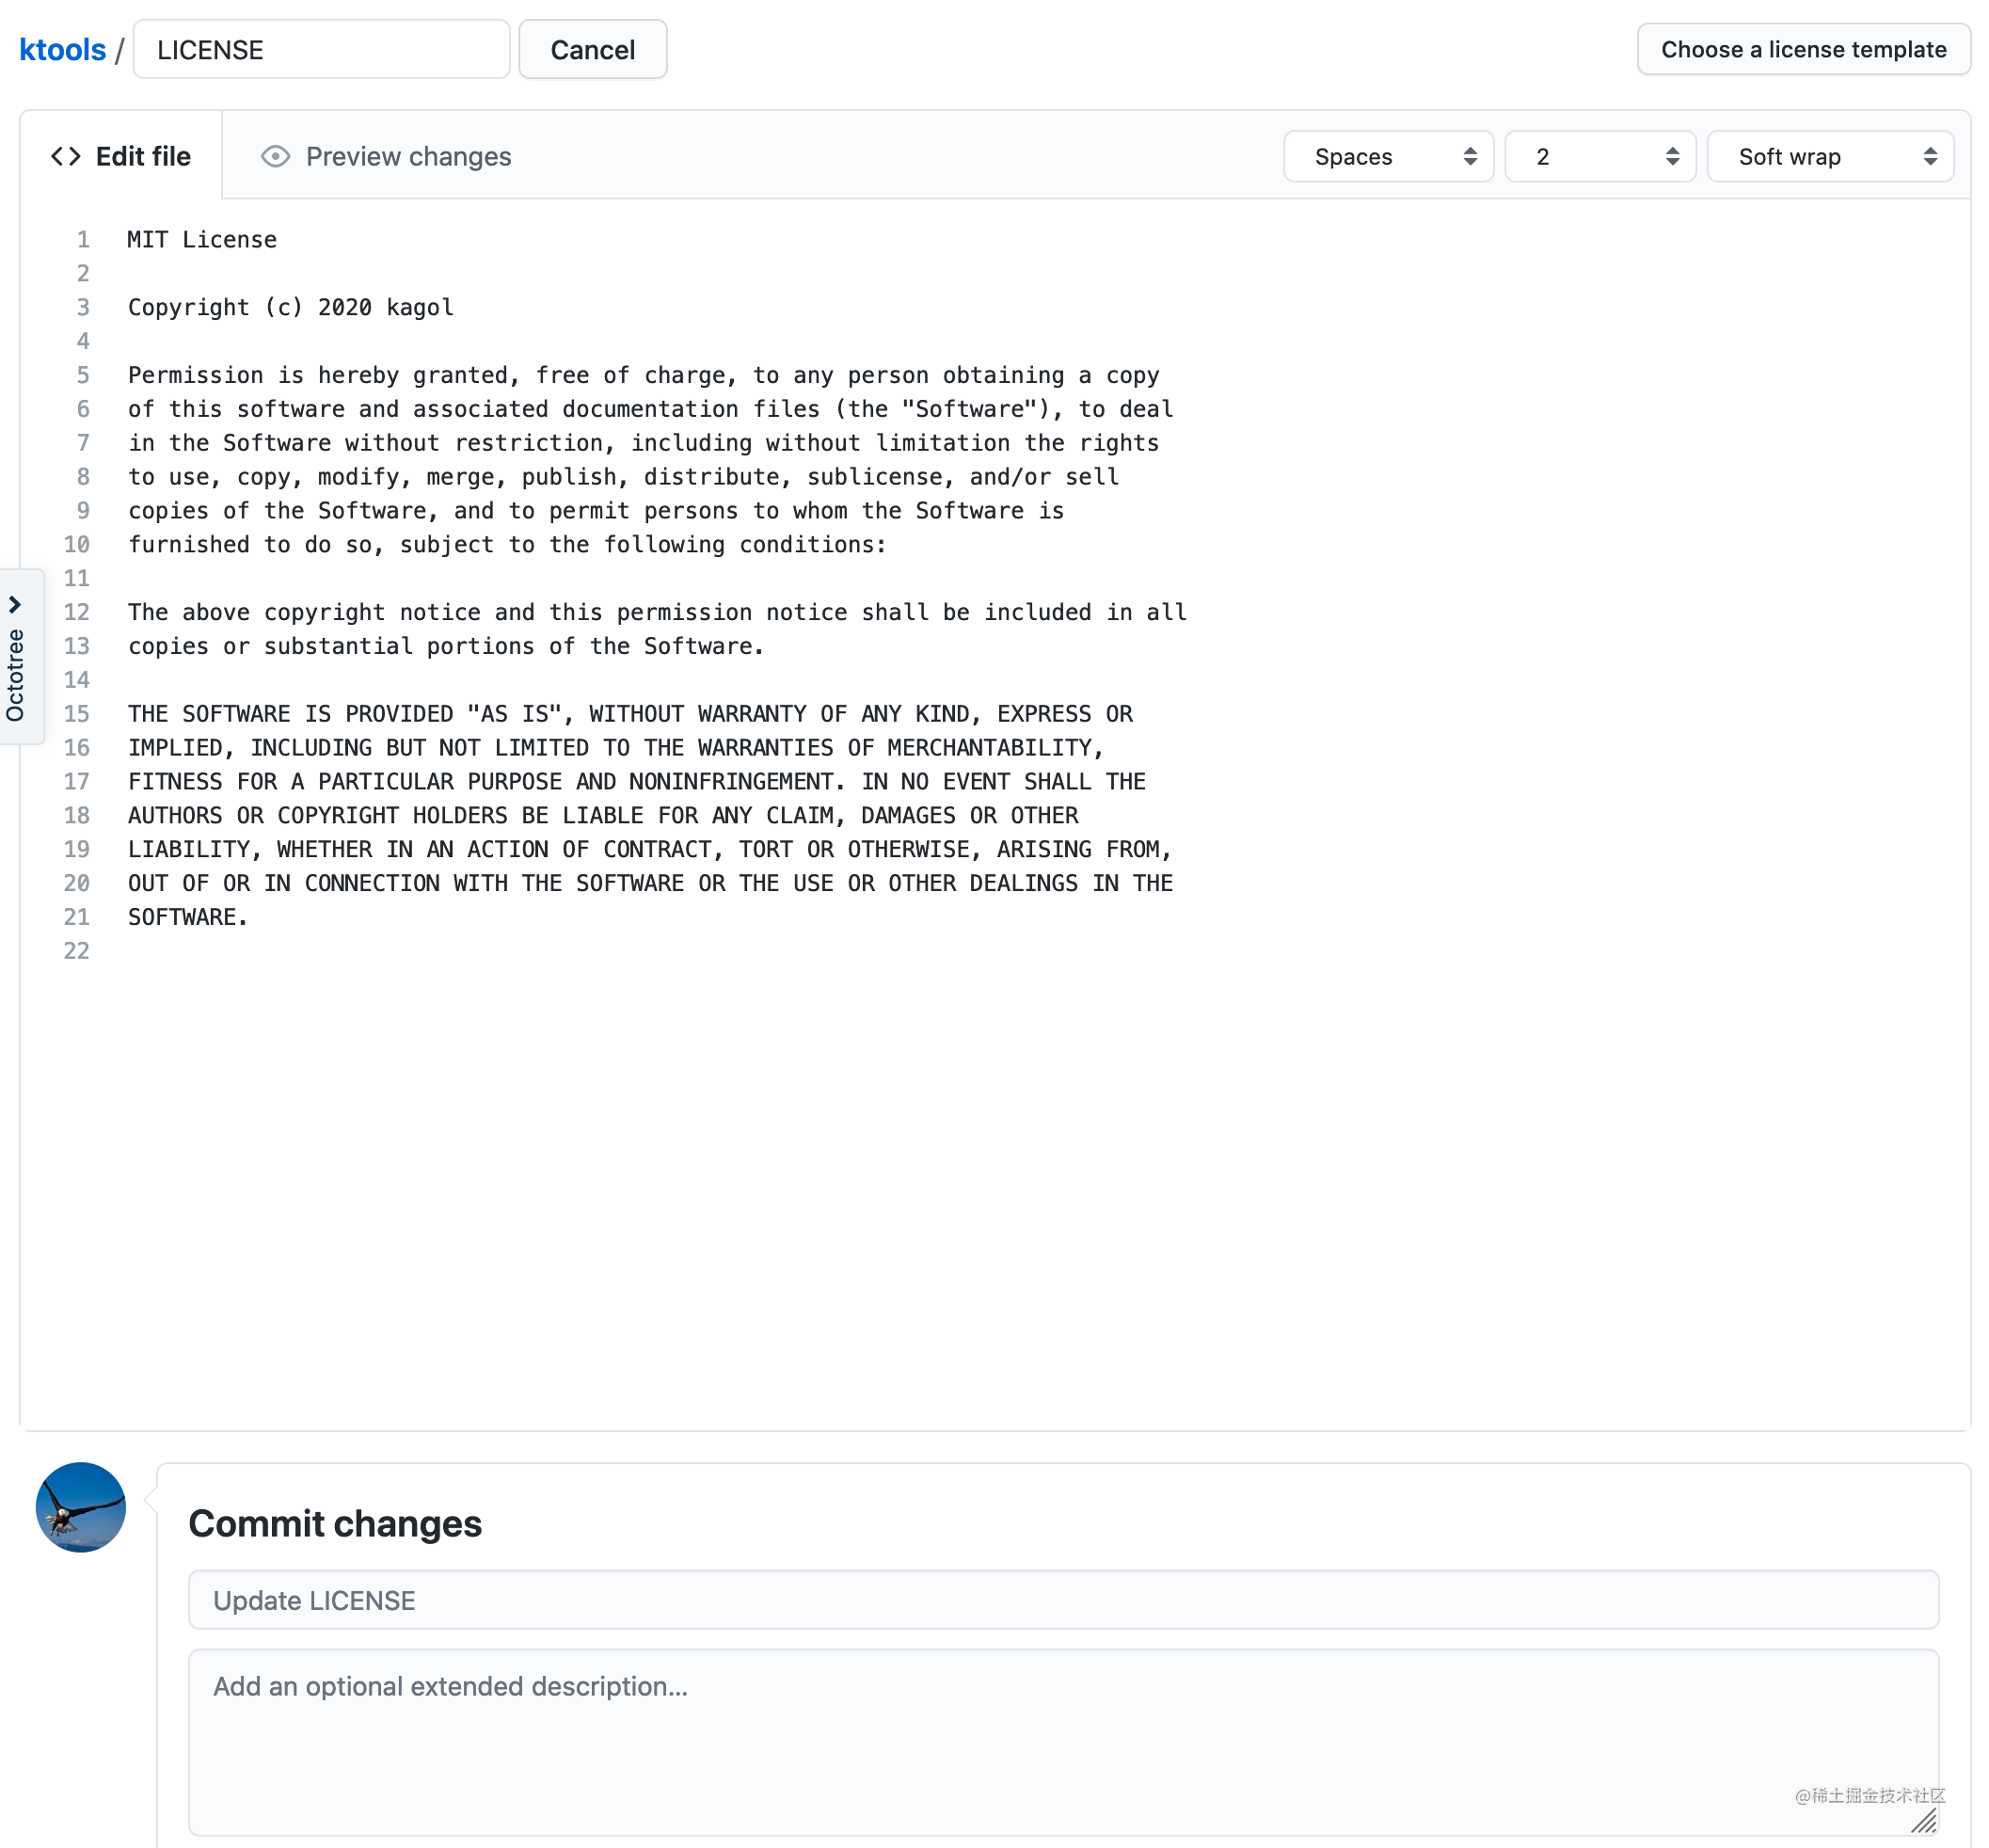
Step 4: 提交
点击创建文件页面下方的Commit new file即可提交 LICENSE 文件到代码仓库。
提交之后会自动跳转到 LICENSE 页面,效果如下:

1.3 初始化 package.json
添加 .gitignore / LICENSE 这两个基本的文件之后,下一步就是初始化 package.json 文件,这是管理依赖包及其版本的包配置文件,前端项目必备。
我们可以使用以下命令创建一个默认的 package.json:
shell
npm init -y增加 -y 参数是不想一直按 Enter😄
创建好的 package.json 文件如下:
json
{
  "name": "ktools",
  "version": "1.0.0",
  "description": "",
  "main": "index.js",
  "scripts": {
    "test": "echo \"Error: no test specified\" && exit 1"
  },
  "repository": {
    "type": "git",
    "url": "git+https://github.com/kagol/ktools.git"
  },
  "keywords": [],
  "author": "",
  "license": "MIT"
}
我们可以简单地修改和完善下。
name和version分别是包名和版本号,均可后续发布时通过脚本动态修改,不用管。
description描述可以加下:
json
"description": "前端工具库"main/scripts这些后续在构建部署脚本的章节会细讲。
keywords/author可以加下:
json
"keywords": [
  "toolkit",
  "rollup",
  "typescript"
],
"author": "Kagol",
配置好 package.json,后续安装依赖包时会自动更新该文件,可以非常方便地进行依赖管理。
1.4 配置 TypeScript tsconfig.json
TypeScript 这种强类型的语言,是对 JavaScript 很好的补充和增强,目前来看前景很好,必须用起来。
安装 tsc
我们可以使用 tsc 命令行工具快速创建 TypeScript 默认配置文件。
先确认下是否安装 tsc,输入命令:
shell
tsc -v出现以下命令说明未安装:
shell
-bash: /usr/local/bin/tsc: No such file or directory可以通过以下命令全局安装:
shell
npm i -g typescript成功安装之后,再查看下tsc版本:
shell
$ tsc -v
Version 4.1.2
生成 tsconfig.json 配置文件
可以使用以下快速生成默认的 tsconfig.json 配置:
shell
tsc --init生成的 tsconfig.json 文件如下(已删除注释代码):
json
{
  "compilerOptions": {
    /* Visit https://aka.ms/tsconfig.json to read more about this file */

    /* Basic Options */
    "target": "es5",                          /* Specify ECMAScript target version: 'ES3' (default), 'ES5', 'ES2015', 'ES2016', 'ES2017', 'ES2018', 'ES2019', 'ES2020', or 'ESNEXT'. */
    "module": "commonjs",                     /* Specify module code generation: 'none', 'commonjs', 'amd', 'system', 'umd', 'es2015', 'es2020', or 'ESNext'. */

    /* Strict Type-Checking Options */
    "strict": true,                           /* Enable all strict type-checking options. */

    /* Module Resolution Options */
    "esModuleInterop": true,                  /* Enables emit interoperability between CommonJS and ES Modules via creation of namespace objects for all imports. Implies 'allowSyntheticDefaultImports'. */

    /* Advanced Options */
    "skipLibCheck": true,                     /* Skip type checking of declaration files. */
    "forceConsistentCasingInFileNames": true  /* Disallow inconsistently-cased references to the same file. */
  }
}
默认的配置其实已经够用,我们不做修改,后续可以根据需要删减配置。
1.5 配置Rollup rollup.config.js
初始化工程的最后一步就是配置 Rollup,先创建一个 Rollup 配置文件,没有 Rollup CLI 工具不支持初始化配置文件,只能手动创建:
shell
touch rollup.config.js然后在 rollup.config.js 中增加以下内容:
js
import resolve from 'rollup-plugin-node-resolve';
import commonjs from 'rollup-plugin-commonjs';
import typescript from 'rollup-plugin-typescript';
import pkg from './package.json';

export default {
  input: 'src/index.ts', // 打包入口
  output: { // 打包出口
	file: pkg.browser, // 最终打包出来的文件路径和文件名,这里是在package.json的browser: 'dist/index.js'字段中配置的
    format: 'umd', // umd是兼容amd/cjs/iife的通用打包格式,适合浏览器
  },
  plugins: [ // 打包插件
    resolve(), // 查找和打包node_modules中的第三方模块
    commonjs(), // 将 CommonJS 转换成 ES2015 模块供 Rollup 处理
    typescript() // 解析TypeScript
  ]
};
在 package.json 中配置 browser 字段:
json
"browser": "dist/index.ts",安装 Rollup 和 TypeScript 相关依赖:
shell
npm i -D rollup typescript tslib rollup-plugin-node-resolve rollup-plugin-commonjs rollup-plugin-typescript注意 tslib 这个依赖库也是必需的,因为 rollup-plugin-typescript 插件依赖了该库。
Rollup 配置文件每个配置项的具体含义可以参考:https://www.rollupjs.com/guide/big-list-of-options
Rollup 可用插件列表可以参考:https://github.com/rollup/plugins
2 编写工具库源码
有了以上的初始工程,就可以正式开始写工具方法源码。
2.1 走通流程
先写一个 demo,跑通编写源码、构建打包、引入使用的流程。
编写源码
咱们的入口文件配置在了 src/index.ts 中,所以需要先创建该文件:
shell
mkdir src
touch src/index.ts
然后在该文件中编写一些代码测试下打包是否正常:
js
console.log('hello ktools!');构建打包
在命令行中输入以下命令对项目进行打包:
shell
rollup -c执行完之后会在 dist 目录生成打包文件 index.js,内容如下:
js
(function (factory) {
	typeof define === 'function' && define.amd ? define(factory) :
	factory();
}((function () { 'use strict';

	console.log('hello ktools!');

})));
引入使用
这时我们可以随便在一个 Vue / React / Angular 项目下引入这个空壳工具库,看下是否正常:
比如在 Vue CLI 工程的 src/main.js 中增加以下代码
js
import Vue from 'vue';
import App from './App.vue';
import router from './router';
import store from './store';

import ktools from '../index'; // 新增加的代码,将在浏览器控制台输出"hello ktools!"

Vue.config.productionTip = false;

new Vue({
  router,
  store,
  render: h => h(App),
}).$mount('#app');
或者在 Angular CLI 工程中的 src/main.ts 文件中增加:
js
import { enableProdMode } from '@angular/core';
import { platformBrowserDynamic } from '@angular/platform-browser-dynamic';

import { AppModule } from './app/app.module';
import { environment } from './environments/environment';

import ktools from '../index';
console.log('ktools:', ktools); // 必须加这个才能输出"hello ktools!",因为没有导出任何东西,所以打印出来的ktools是一个空对象

if (environment.production) {
  enableProdMode();
}

platformBrowserDynamic().bootstrapModule(AppModule)
  .catch(err => console.error(err));
2.2 编写工具方法
流程走通之后,就可以正式编写工具方法。
我们编写一个判断一个字符串是否是一个有效的 hex 十六进制颜色值的工具方法:isColor。
先创建 src/is-color.ts 文件:
shell
touch src/is-color.ts增加以下内容:
js
/**
 * 判断字符串是否是十六进制的颜色值
 * @param value
 */
const isColor = function(value: string): boolean {
  return /^#([0-9a-fA-F]{6}|[0-9a-fA-F]{3})$/.test(value);
}

export default isColor;
然后在index.ts入口文件中增加引入is-color.ts文件的代码:
js
import isColor from './is-color';

export {
  isColor,
};
重新执行 rollup -c 进行构建,生成的 dist/index.js 如下:
js
(function (global, factory) {
  typeof exports === 'object' && typeof module !== 'undefined' ? factory(exports) :
  typeof define === 'function' && define.amd ? define(['exports'], factory) :
  (global = typeof globalThis !== 'undefined' ? globalThis : global || self, factory(global.ktools = {}));
}(this, (function (exports) { 'use strict';

  /**
   * 判断字符串是否是十六进制的颜色值
   * @param value
   */
  var isColor = function (value) {
      return /^#([0-9a-fA-F]{6}|[0-9a-fA-F]{3})$/.test(value);
  };

  exports.isColor = isColor;

  Object.defineProperty(exports, '__esModule', { value: true });

})));
再到项目中引入:
js
import { isColor } from '../index';
console.log('isColor #c6e48b:', isColor('#c6e48b')); // isColor #c6e48b: true
console.log('isColor #c6e48:', isColor('#c6e48')); // isColor #c6e48: false
一切正常!
3 增加构建发布脚本
到这里其实我们的工具库 ktools 已经完成了 90%,还差最后一步,就是发布到 npm 仓库,可以手工发布。
3.1 手工发布
将 package.json 文件拷贝到 dist 目录,修改 version 为本次发布的版本号,比如:0.0.1,然后进入该目录:
shell
cd dist执行以下命令即可将我们的 ktools 工具库发布到 npm 仓库:
shell
npm publish带着欢呼雀跃的心情等待发布成功,结果报错,以下是报错信息:
shell
$ npm publish
npm notice
npm notice 📦  ktools@0.0.1
npm notice === Tarball Contents ===
npm notice 315B index.html
npm notice 634B index.js
npm notice 691B package.json
npm notice === Tarball Details ===
npm notice name:          ktools
npm notice version:       0.0.1
npm notice package size:  1.1 kB
npm notice unpacked size: 1.6 kB
npm notice shasum:        35c3501906443ff46be51c2747c07e73136bf85c
npm notice integrity:     sha512-SZTM0msux0+Pt[...]IWmV6Gx5Tz41w==
npm notice total files:   3
npm notice
npm ERR! code E403
npm ERR! 403 403 Forbidden - PUT http://registry.npmjs.org/ktools - Package name too similar to existing packages; try renaming your package to '@kagol/ktools' and publishing with 'npm publish --access=public' instead
npm ERR! 403 In most cases, you or one of your dependencies are requesting
npm ERR! 403 a package version that is forbidden by your security policy.

npm ERR! A complete log of this run can be found in:
npm ERR!     /Users/kagol/.npm/_logs/2020-12-05T05_42_31_632Z-debug.log
看提示似乎是包名重复,提示里还很友好地建议先重命名包名为 @kagol/ktools,然后再发布。
那我们就按照提示尝试下改个名字吧,加个scope:
json
"name": "ktools"

->

"name": "@kagol/ktools",
改完名字重新发布,成功啦!
shell
$ npm publish
npm notice
npm notice 📦  @kagol/ktools@0.0.1
npm notice === Tarball Contents ===
npm notice 22.0kB index.js
npm notice 1.2kB  package.json
npm notice 1.8kB  README.md
npm notice === Tarball Details ===
npm notice name:          @kagol/ktools
npm notice version:       0.0.1
npm notice package size:  6.9 kB
npm notice unpacked size: 25.0 kB
npm notice shasum:        d85994aecc86160862cef4f0033e5bfdaa136072
npm notice integrity:     sha512-UEDEJEsMSXcMg[...]yY4KsXp4mXIBA==
npm notice total files:   3
npm notice
+ @kagol/ktools@0.0.1
这时可以在项目中正式安装并引入使用。
先安装:
shell
npm i @kagol/ktools使用方式和之前的一样,只是需要修改引入方式:
js
import { isColor } from '@kagol/ktools';
console.log('isColor #c6e48b:', isColor('#c6e48b')); // isColor #c6e48b: true
console.log('isColor #c6e48:', isColor('#c6e48')); // isColor #c6e48: false
3.2 通过脚本发布
每次发布还要将文件拷贝来拷贝去,又要修改包名,又要改版本号,很麻烦,可以编写脚本将这个过程自动化。
主要分以下步骤:
- 拷贝文件
- 修改文件
- 发布
Step 1: 拷贝文件
在 package.json 的 scripts 中增加拷贝文件的脚本:
shell
"copy": "cp package.json README.md dist",Step 2: 修改文件
新建 scripts/publish.js 文件,增加以下内容:
js
const path = require('path');
const shelljs = require('shelljs');
const program = require('commander');

const targetFile = path.resolve(__dirname, '../dist/package.json');
const packagejson = require(targetFile);
const currentVersion = packagejson.version;
const versionArr = currentVersion.split('.');
const [mainVersion, subVersion, phaseVersion] = versionArr;

// 默认版本号
const defaultVersion = `${mainVersion}.${subVersion}.${+phaseVersion+1}`;

let newVersion = defaultVersion;

// 从命令行参数中取版本号
program
  .option('-v, --versions <type>', 'Add release version number', defaultVersion);

program.parse(process.argv);

if (program.versions) {
  newVersion = program.versions;
}

function publish() {
  shelljs.sed('-i', '"name": "ktools"', '"name": "@kagol/ktools"', targetFile); // 修改包名
  shelljs.sed('-i', `"version": "${currentVersion}"`, `"version": "${newVersion}"`, targetFile); // 修改版本号
  shelljs.cd('dist');
  shelljs.exec('npm publish'); // 发布
}

publish();
这里最核心的两步:
- 修改包名
- 获取正确的版本号并修改
其中修改文件使用 shelljs 库,获取版本号参数使用了 TJ 大神的 commander 工具。
需要提前安装这两个依赖库:
shell
npm i -D shelljs commander另外需要在 package.json 中增加构建的脚本命令:
json
"build": "rollup -c && npm run copy",Step 3: 发布
发布的步骤比较简单,已经放在 publish.js 脚本文件中。
每次发布只需要依次运行以下命令即可:
shell
npm run build
npm run publish -- -v 0.0.2后续可以考虑将其集成到流水线,实现完全的自动化部署,这里可以参考我之前写的一篇文章:大厂是如何用DevCloud流水线实现自动化部署Web应用的?
4 小结
本文详细地介绍了使用 Rollup + TypeScript 打造一个开源工具库的流程和步骤,并介绍如何配置 Rollup 和 TypeScript,如何编写部署脚本自动化发布工具库到 npm 仓库。希望大家喜欢,并欢迎给个 Star 🌟 鼓励,以下是 ktools 工具库的源码地址:
https://github.com/kagol/ktools
发布时间: